So, you’ve just spent hours, maybe days, working on an image, carefully using a 16-bit depth, to keep the colors perfect and the tones smooth. The sky will be perfect printed at 2880, and the clouds sublime.
You save the file as 16-bit tif, and send it off to the printer. And it is indeed lovely! Congratulations!
… but something is not quit right. The tones are not perfectly smooth and the shadow just look odd, at least seen from some angles.
You look closely and see very subtle banding. Whoa! What’s this???
The quick answer: it’s an 8-bit print, not a 16-bit print.
Here’s how to see the effect yourself, and how to tell if your printer is actually getting 16-bit images.
Let’s run this experiment:
Open Photoshop.
Create a new image 4000 pixels wide and 1000 pixels tall and be sure it’s set to white background and 8-bit RGB.
Select the gradient tool with B&W and while holding down the shift key, drag a gradient across the full width of the canvas.
Save the image as “8-bit” and JPEG, maximum quality.
Now do the same thing all over again, and again make the image 4000 px wide but this time, make it 2000 pixels tall.
Also different: this time be sure to set it for 16-bit instead of 8.
Drag out the gradient again.
NOW, drag the 8-bit image you created first on to the open 16-bit image. (This places the smaller 8-bit image on top of the larger 16-bit, right in the center.
Flatten the image (using the layers menu).
Save the image file as a TIFF, 16-bit, uncompressed. I suggest naming it “8 & 16 bit”.
Now it’s time to use it.
First, open the Photoshop info window, and set the RGB readout value to 16 bit, actual color.
Then zoom in to about 3200- 6400 percent, so that each pixel is about 1/2″ size on your screen.
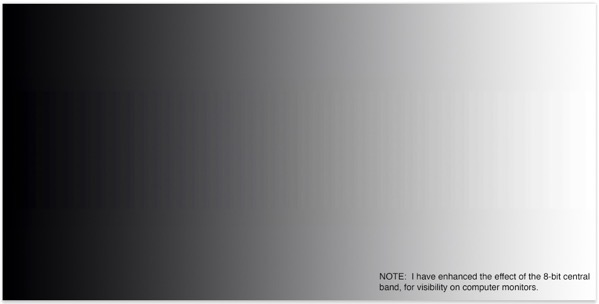
If you followed the instructions above, the center 50% of your image will be at 8-bit depth, and the top/bottom 25% will be at 16-bit depth.
Scroll to the top or bottom, and watch the info window 16-bit readout as you scan the cursor across the width of the image. You will see a different value for every single pixel/column you scan across.
Now, if you scroll to the middle of the image, and repeat the process, you’ll see that you have to cross about a dozen different pixels before the 16-bit number changes.
That’s because there are only 256 levels across the whole image in 8-bit mode, so a column of several pixels wide will have the same value. (ie 15 columns at 121, then 15 columns at 122, and so on.)
(Depending on the quality and calibration of your monitor, you -may- be able to see the faint banding in the central 8-bit section.)
Finally, you can use that same saved “8 & 16 bit” tif file to check your printer. You can see the effect in a printed image, -and- you can see if your printer really printed using 16-bits.
Print the image at highest resolution on a RC paper. If the file was sent at 16-bits, you’ll see the vertical banding in the center of the image, where the 8-bit section is, and no banding at the top and bottom 25%.
If you see the banding, but it’s across the entire image, from top to bottom, then your image was automatically converted to 8-bit by the software you used to print it (such as Qimage, or anything else that uses Apple’s internal vImage API.)
In the example image below, I have enhanced the effect to make it visible online. In an actual 16-bit print the effect is much more subtle. The point however, is that it IS noticeable, usually in areas of near-flat tones, such as sky or shadows.
If you have seen this in your own prints, now you know why: it’s being printed as an 8-bit image.
hth
