I recent ran across someone who didn’t understand what a raw file is, and had it confused with an image file.
So, let’s take a quick look at it.
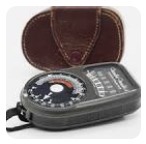
Perhaps you’re old enough to remember the Weston Lightmeter:

It had a “photovoltaic cell” (don’t panic) which is simply some goop which when exposed to light generates a very tiny electrical current. The brighter the light, the greater the current, and the greater the current, the farther the little needle on the display would swing to the right. Underneath the needle is a printed chart, with numbers, so your light meter reading was simply the number that was underneath the needle when it stopped moving.
In other words, the light meter effectively measured the “luminosity” (intensity/brightness of the light) in any given environment.
Now, if you were to cover the front of the meter, where the photovoltaic cell lives, with say blue cellophane, then only the blue light would enter, and you’d be measuring the luminosity of the blue light only. If you wanted to know the luminosity of only the green or red part of the spectrum, you’d just cover the cell with green (or red) cellophane.
OK: simple enough… but that is exactly how your digital camera captures the data it needs to (later) make an image.
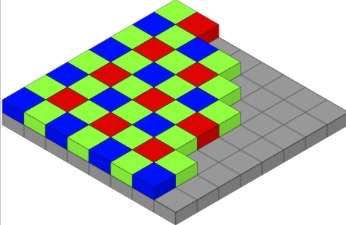
The sensor in your camera, which gets exposed to light when you push the shutter release button, is (in the miracle of modern technology) covered in a checker-board pattern, with literally millions of “little Weston meters”… and each one has a piece of colored cellophane (aka a “filter”) on it, either red or green or blue. (The actual arrangement of those filters is called a Bayer pattern.) Here’s what it looks like:

So, when the sensor is exposed to light, each sensor cell records a single number that is relative to the intensity of light at that location on the sensor. In the image above, that would look like this:
(I’m making up the numbers, of course, for this example>)
(Row 1) green = 300 red = 55 green = 340 red = 66
(Row 2) blue = 4000 green = 421 blue = 3980 green = 345
(Row 3) green = 298 red = 66 green = 302 red = 75
(Row 4) blue = 4100 green = 407 blue = 4009 green = 301
If you were going to save those 16 cells (or all millions of them) to memory or on a disk, the data for that group, as seen in the recording, would be:
300 55 340 66
4000 4213 980 345
298 66 302 75
4100 407 4009 301
or really more like this, all run together:
300 55 340 66 4000 4213 980 345 298 66 302 75 4100 407 4009 301
Those individual cells are called “photosites” or sometimes “sensels”, but you’ll notice that each one records the intensity of only one color. The whole thing is called a “mosaic” since that’s what it looks like. They are NOT called “pixels” (which are on your monitor or printed photography because “pixel” is from an image, and is a single cell with all three values, red, green and blue, so that you get full color in each place, not just one color.)
That is what a ‘raw’ (which means not finished, or not cooked if you prefer) file is: a long string of numbers representing the luminosity intensity values straight from the camera sensor.
—-
Obviously however, that’s not an image – it’s just a bunch of data. Even more apparent is that each cell as recorded is not “full color” but only the intensity of red, green or blue.
Where does the full color image (with a lot more colors than only red, green or blue) come from?
Computer magic: that mosaic is run through software which “demosaics” it. The software looks at all the surrounding cells, RGB, and extrapolates (figures out) what the full color of each pixel (now is the time to call it a pixel) should be, and saves each cell with three numbers: a value for red, a value for blue, and a value for green. A pixel is a “picture element” which has a RGB component to it.
The data might look like this:
(Row 1, Cell 1) red = 255 green = 133 blue = 18
(Row 1, Cell 2) red = 255 green = 131 blue = 19
(Row 1, Cell 3) red = 254 green = 136 blue = 21
(Row 1, Cell 4) red = 253 green = 140 blue = 22
or those 4 cells just from Row 1 above:
255 133 18
255 131 19
254 136 21
253 140 22
aka
255 133 18 255 131 19 254 136 21 253 140 22
In the image file, instead of one number per cell, there are now three numbers per cell representing the full R, G, B value of that single pixel.
After fully demosaicing the data from the sensor/raw file (which itself remains unchanged ) those extrapolated values are saved into a new, different and familiar “image” file, such as a jpg or tif. Now you have two files: a raw file (in which the original data is unchanged) and a new image file (full of new data).
Let’s say you have a bag of groceries, including, flour, eggs, sugar and milk.
A “raw” file is more like the bag of uncooked groceries, while an “image” file is more like a finished cake.
Well, that’s the gist of it. Vastly oversimplified of course, but that’s basically how it all works.
HTH
addendum:
about editing a raw file: You don’t. The raw file data remains the same. The changes are applied when you demosaic the raw file into a bit-map file.
In digital photography, the “sidecar” file associated with a raw image file typically contains metadata and adjustments made to the image, including exposure adjustments, white balance, and other non-destructive edits. The sidecar file is often in XML format (commonly using the .xmp extension) and is separate from the original raw image file.
The sidecar file records the changes you’ve made to the image in your editing software without altering the original RAW data. When you open the raw file in the same or compatible software, these adjustments are applied according to the information stored in the sidecar file. This allows for flexibility, as you can adjust or revert changes without losing any original image data.